Final Speaker
Process
Initial Design

|

|
Second Design Draft

|

|
Third Design Draft

|

|
Final Plan

|

|
Prototype
|
I built a prototype to test if the electric aspects of my speaker. I wrapped magnet wire around a tube that was slightly larger than the stack of powerful magnets. A magnetic washer was underneath the base plate, to attach the magnets to the base. The magnet wire coil was glued to the styrofoam top plate. The two ends of the magnet wire were attached to an amplifier, which the mp3 player was also attached to. The plate was suspended with three pieces of folded paper. The vibration occurred between the plastic tube and the magnets.
My prototype worked, but I realized that the mp3 player was not strong enough to power the speaker by itself, so I would need to get a small amplifier for the final product. Also, because the tube was made of plastic, it made a buzzing noise when it hit the magnets. I will use a paper tube for the final draft.
|

|
Building the Amplifier

|

|
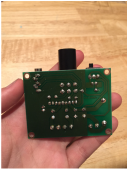
I built an amplifier from a kit. The kit contained all of the pieces needed, and I soldered them into place. I tested the amplifier with real speakers, and discovered that it needed 12 volts of power.
|
|

|
Building the Speakers
|
|
For the final speaker, I decided to make two sizes, one small one that will capture the higher notes, and a big one to capture the mid and low notes. The bottom (larger) speaker was made using a styrofoam plate, and the top (small) speaker was made with a styrofoam bowl. I used styrofoam because it is light and is able to vibrate well. Both speakers had a stack of 10 1/16' by 3/4' magnets. I started by creating the electromagnets by wrapping an old business card around the stack of magnets to get a tube that fit snuggly over the magnets, but could still move up and down. Next, I wrapped those tubes with magnet wire, and hot glued the ends in place so they wouldn't unravel. Because the magnet wire is so thin and fragile, I soldered the ends to a thicker wire. I placed the styrofoam plate and bowl into the head and body. Through the bottom hole, I was able to hot glue the electromagnets to the plate and bowl. Then, on the middle board, I cut a whole and slipped the wires through, so that I could connect them to the bottom speaker. Because the head is removable, I took an old ipod connection wire and soldered the ends to the end of the electromagnet wire. I fed the wire from the bottom speaker up the side of the base, and hot glued it out of the way. I soldered that wire to the other end of the ipod connection cord. Then, I glued the magnets to the base board. I centered the head on the middle board, and hot glued it in place. I repeated this for the base. I suspended the speakers using strings and hot glue, to hang it from the base and from the head.
|


Building the Speaker Frame
|
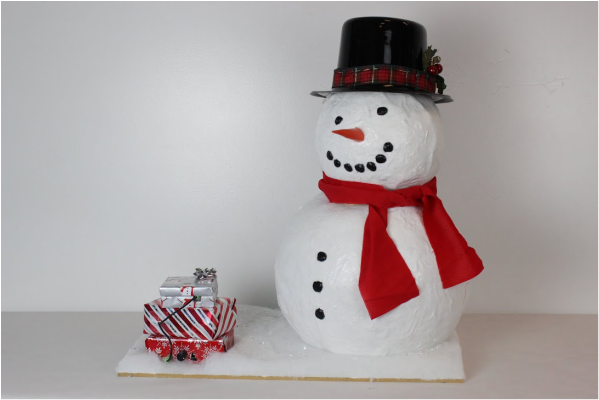
To build the frame for my speaker, I started by covering a bounce ball and a balloon with paper mache, leaving the top and bottom of each open. While they were drying, I cut out a large rectangle of wood for the base, and a small circle of wood that would go in between the head and the base. When the head and base were dry, I painted them white and covered them with Mod Podge and sparkles, to make them look like snow. I used small drops of hot glue to create a face and buttons on the snowman. I painted these black. The nose is made out of orange construction paper covered in Mod Podge. I used quilt batting to cover the wood base, and a scarf to cover the area where the head connects to the body. I put sparkles on the quilt batting to make it look like snow. I used a lightweight plastic hat to cover the hole on the top of his head, which I decorated with Christmas ribbon and a holly leaf.
|
|


